This is the last article in a four part series on band trading. In the previous articles, we reviewed the importance of trends for bands and a few types of price bands. In this article, we will study some guidelines for band based trading systems which, regardless of the band type, are limited and similar.
Probably one of the most important decisions is how often the system will trade. You must decide whether your system will be in and out of the market or if it will be always in the market (i.e. a reversal strategy) by changing from long to short and back again. If so, the following rules generally apply:
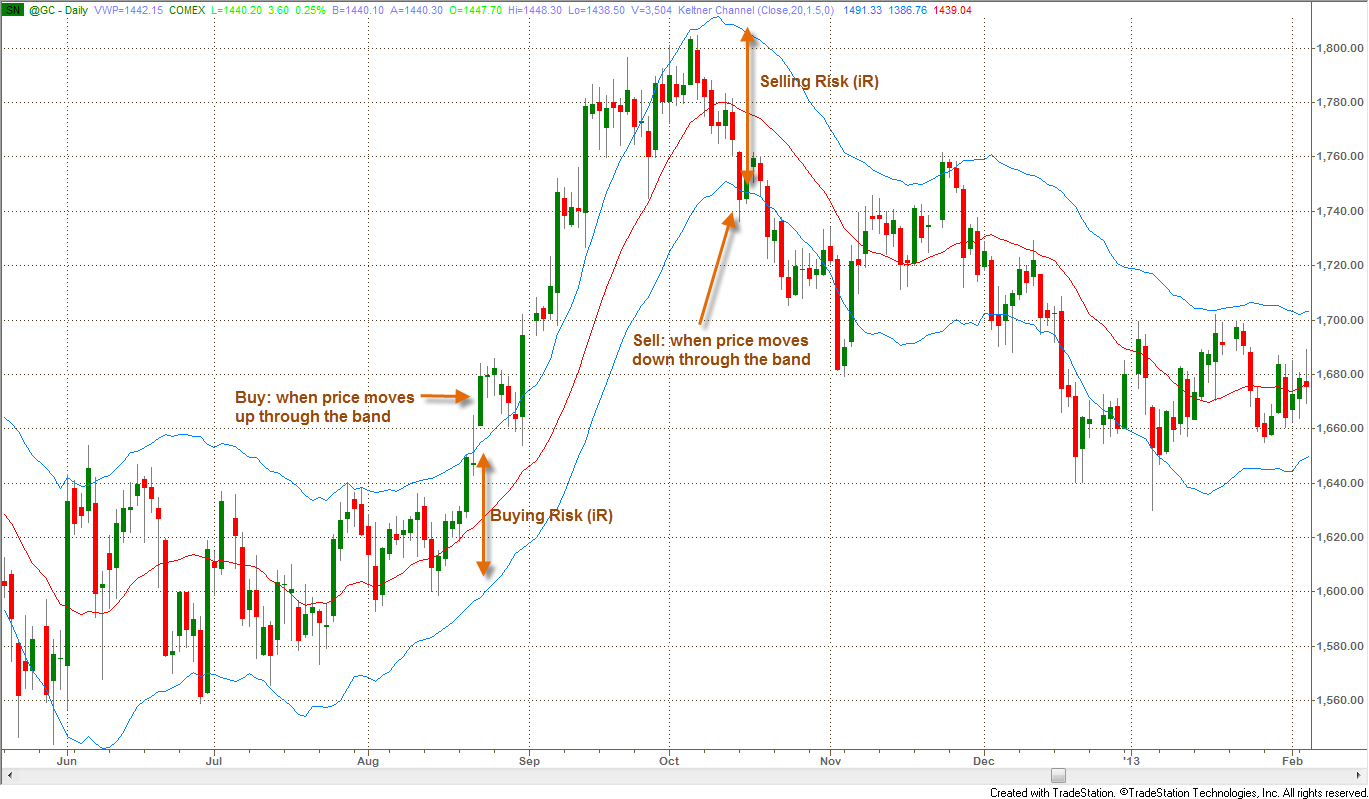
- Buy: (if short, cover short and go long) when then price closes above the upper band.
- Sell: (if long, close out long and go short) when price closes below the lower band.
A logical place for your initial stop could be the opposite band which makes the width of the band at entry equal to 1R.
Figure 1: A standard Keltner Channel plotted on a daily Chart of GC (Gold Futures):
Buy/Sell Rules and initial Risk
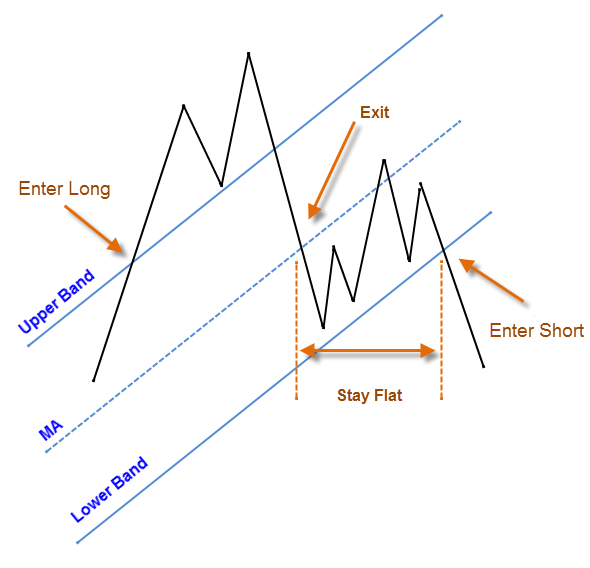
If you prefer to be out of the market at least sometimes, you could exit a position when the price crosses the moving average or other measure of the central trend – long before the price gets to the opposite band (Figures 1 and 2). In this case:
- Enter long: when price closes above the upper band. After the price reverses and closes below the MA, exit.
- Enter short: when price closes below the lower band. Exit when price closes above the MA.
In this case, the band is used for entering trades and the center of the band is used for exiting. In low volatility markets, you may need a separate set of rules which allow for exiting positions but not reentering positions on the same day. If either band is penetrated during the next day, it is considered a new signal to go long or short respectively.

Figure 2: Basic Rules for Trading Long or Short Using Bands
This technique allows a trader to reenter in the same direction in case of a false trend change. If a pullback occurs after exiting a trade, an entry at a later date might be possible at a better price. The technique also reduces the order size by half, which could possibly improve the execution price and allows for scaling in. The technique’s disadvantage occurs when the price changes direction and moves so fast that both the exit price and the new entry signal occur on the same day. Immediately reversing the position is better for fast or volatile market types. Therefore, a trader might have two similar systems with different rules for different market types: volatile vs. quiet.
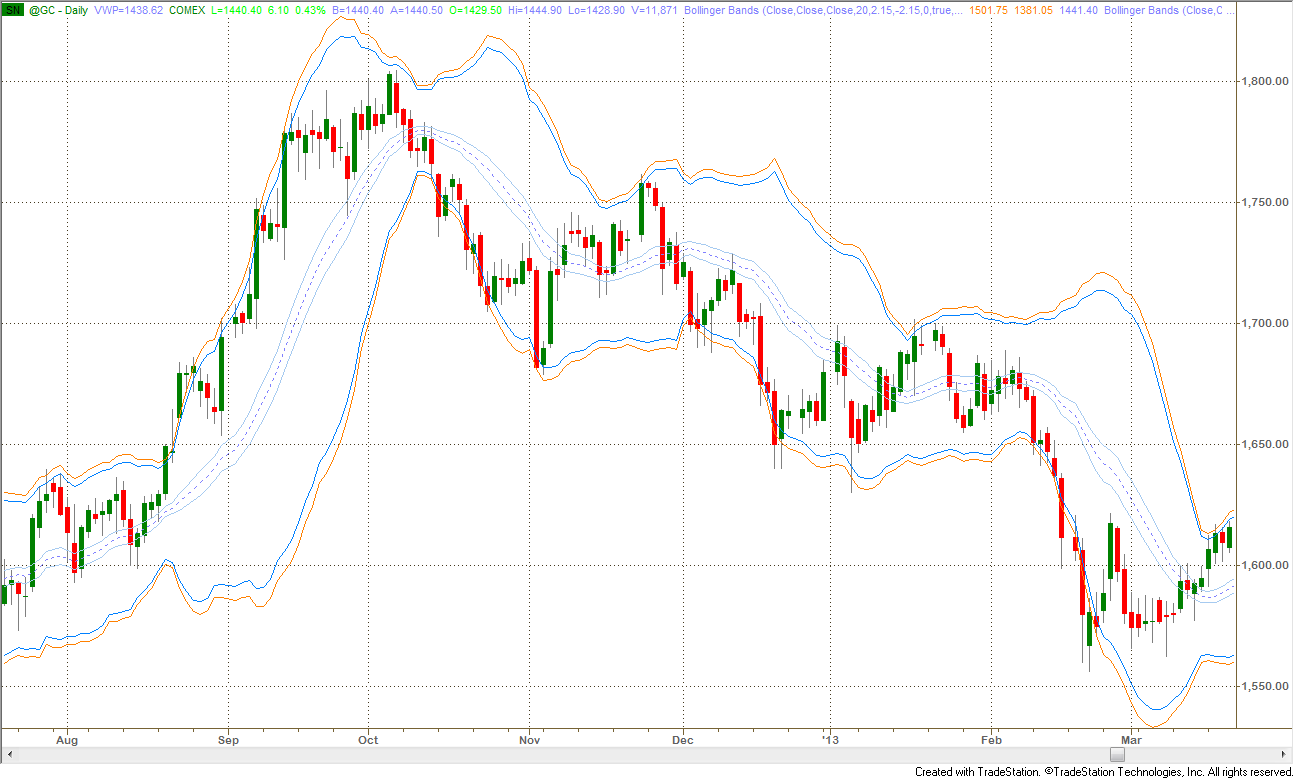
How close is close enough to fire an entry or exit signal? Some traders build a buffer zone around each band and the MA to answer this question. A bar closing anywhere in this zone qualifies and triggers a signal. Trigger zones are particularly useful in automated trading systems and can be built by plotting extra bands at different F (multiplier) values or using a percentage value of the original band and MA. Figure 3 (below) shows this concept:
Figure 3: Trigger Zones on Daily Chart of GC (Gold Futures) with standard Bollinger Bands:
two extra bands are used to create trigger zones around outer bands and the MA
The objective of timing the entry is to minimize risk in the new position. Many band based systems, however, enter at a breakout price level. This method usually results in a poor entry (higher risk) and places a trader in the late stage of the trend – often at a point where prices are ready for a pullback. To overcome this problem, consider entering using any of these following rules:
- After a technical price retracement of 50% (or some other value) following a signal.
- When prices move to within a specific risk level relative to a reversal or exit point.
- At the next day’s open following a signal.
- With a delay (1, 2, or n time periods) after the signal is indicated.
- Right before market close when and entry signal has been indicated intraday.
If you are able to enter and exit based on intraday price action, you could add one additional rule:
- Execute only one order intraday: either to liquidate a current position or to enter into a new position.
Better entry prices definitely improve the overall performance, however an entry rule that is contingent on a technical price level, such as a retracement, may not be triggered and risk missing the entry. Usually a missed contingent order is a missed profitable trade. Therefore, it is better to combine the entry order to include both possibilities, for example:
- Buy/Sell after price retraces (35% x ATR) – OR – Enter on the next bar.
The next step is to test your timing rules. You should be aware of your personal biases; in most cases perceived improvements fail testing. There are two concepts to be cognizant of that usually conflict:
- Improved execution
- Improved performance
Timing rules usually improve execution but they do not always improve a trading system’s performance for one primary reason — missed trades. In my testing, I have found that certain system rules can get better entry prices by waiting for a pullback. The net result of those better entry prices, however, was missed entries on fast breakouts which decreased the overall system performance. I’m not sure I would have believed that had I not seen it myself.
Different band types can be combined to create scalping zones and swing trading zones. In this context, scalping means very short trades that last may be 3 bars, possibly less, and swing refers to staying in longer trends to capture the majority of the move.
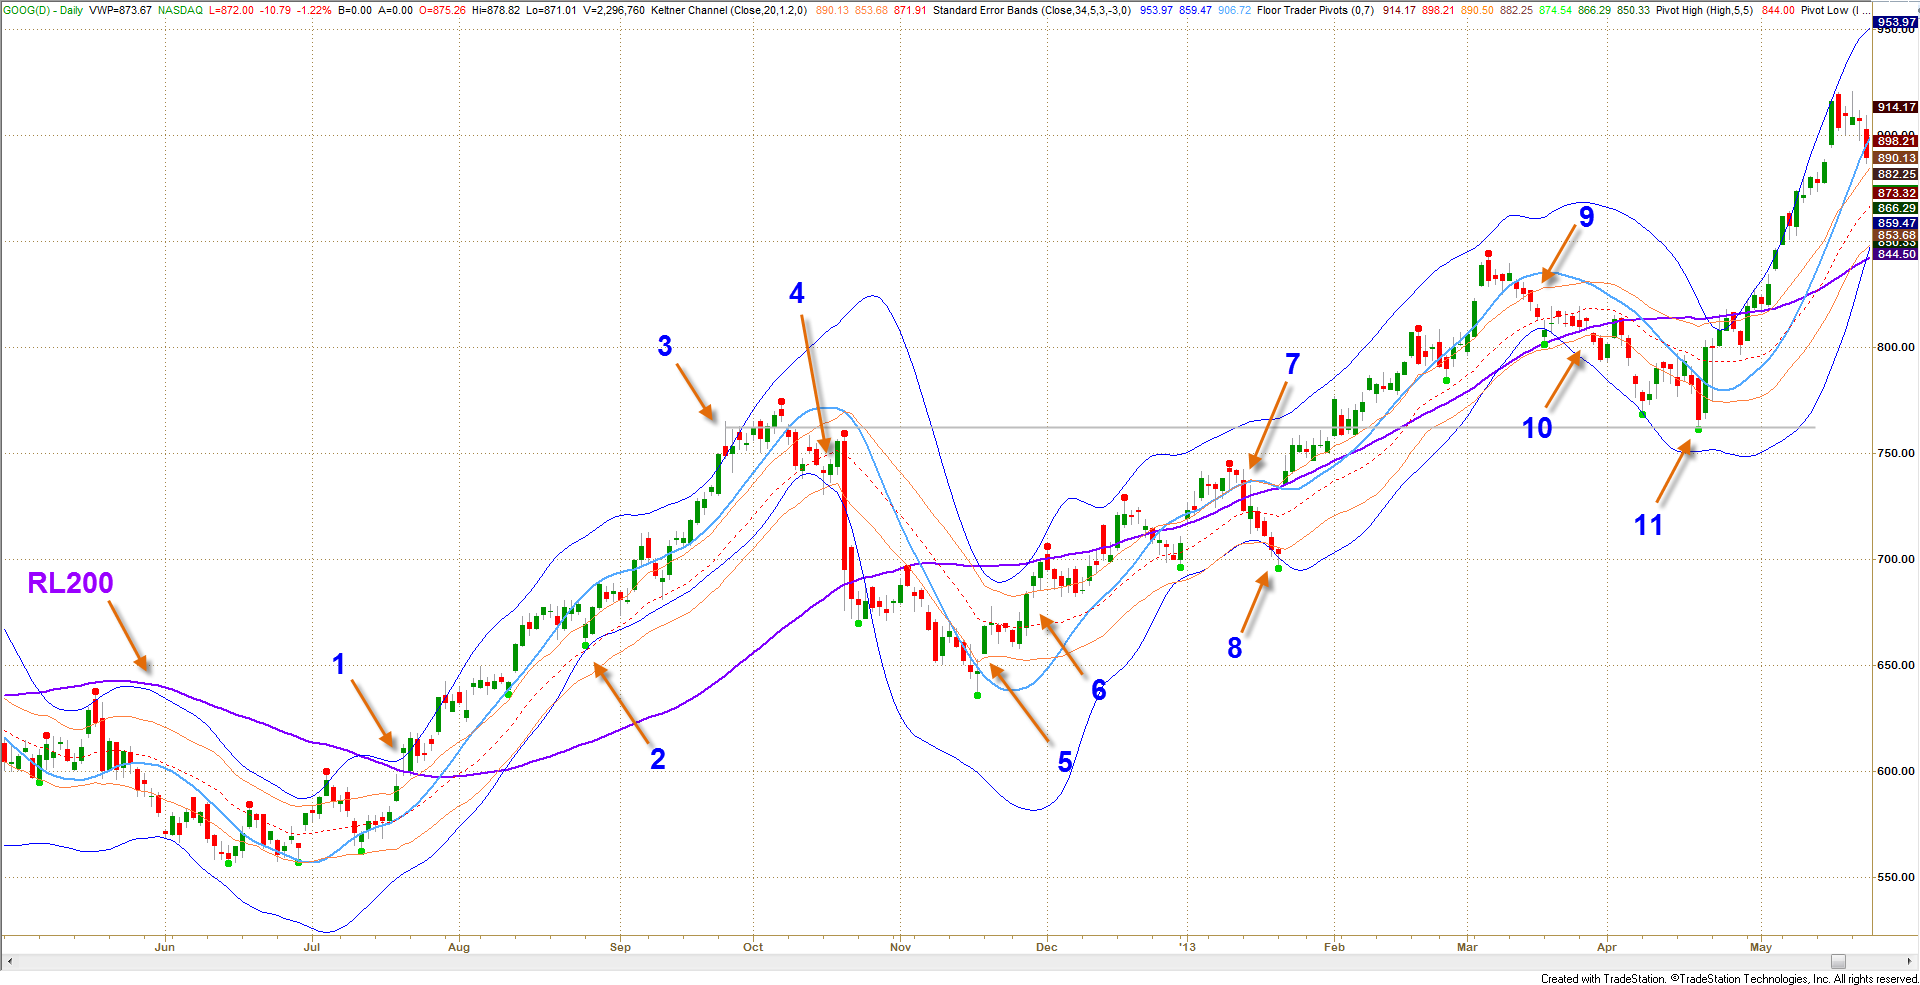
Two bands that work exceptionally well together are SE bands and Keltner channel. Figure 4 shows a one year daily chart of Google. On this chart I have plotted two bands:
- Keltner Channel: in orange, is used to define a noise channel 1.2 ATR wide. Any price action in this zone will be scalped regardless of prevailing trend. A new scalp trade is entered when price crosses into the Keltner channel and exited when it reaches the opposite band of the Keltner channel. There are three possible scalp trades in Fig. 4 between points 5-6, 7-8, and 9-10.
- SE Bands: in blue, define the swing zone in the direction of the prevailing trend, defined by the linear regression curve in the centre. A trade is entered when prices close outside the Keltner channel inside or outside SEB. Possible swing trades are at points 1, 4, 6, the gap up after 8, 10, and the two-bar reversal at 11.
Figure 4: Swing and Scalp Zones on Daily Chart of GOOG:
a combination of two different bands help filter out noise to maximize trading opportunities
Any one of the exit and risk management rules above could be used for exits and to define 1R.
If you have been following this series, can you explain why this combination works for filtering noise?
My goal for this series of articles was to provide a general overview of band trading and emphasis the importance of trend and rule-based trading, on which every successful system and trade is built. Due to space limitations, I was able to write about only a few kinds of bands and possible trading techniques utilizing them. We were able to cover some reasonable ground which I hope will help you in your trading.
“Some long for the glories of this world; and some sigh for the Prophet’s Paradise. Ah, take the cash and let the promise go…”
– Omar Khayyam, Persian Poet: The Rubaiyat
